Vendor Report
Overview
The Vendor Report is designed to provide a comprehensive overview of all third-party vendors with whom the organization shares or processes consumer personal information. This report supports our compliance efforts with data privacy regulations such as GDPR, CCPA, and other applicable laws by ensuring transparency and accountability in data handling practices.
Once logged in, the Data Governance Tool displays the Main Screen.
- Navigate to the Reports module on the hamburger menu.
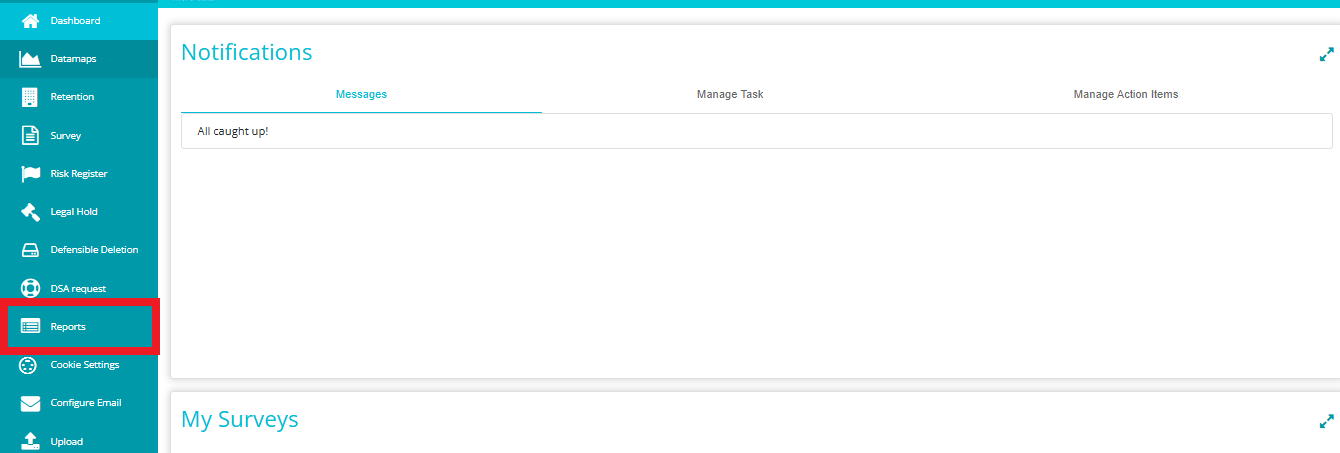
- Click on the Manage Reports

- This selection takes you to the Manage Reports Dashboard, where you can find existing reports and create new ones.
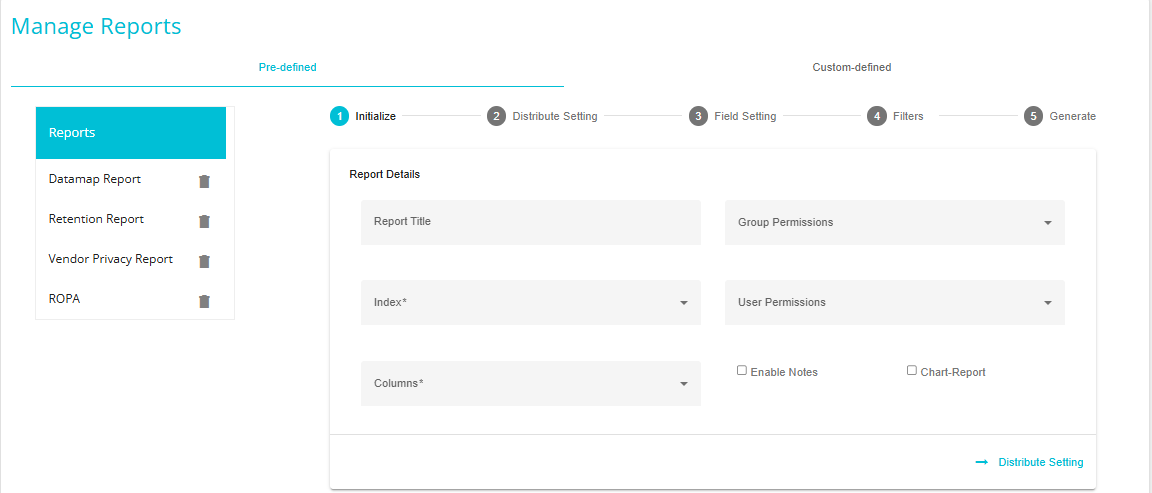
Creating a new Vendor Report
Initialize:
Report Title - Assign a name to the report you are about to generate.
Index - The index is the category the report is to be generated from. This can be Data Governance.
Columns - Choose the columns that you want your report to have from the drop-down Columns menu. (These are the columns part of DataMap)
Group Permissions - this drop-down menu allows you to select the groups that have permission to view the report being created.
User Permissions - this drop-down menu allows you to select the users that have permission to view the report being created.
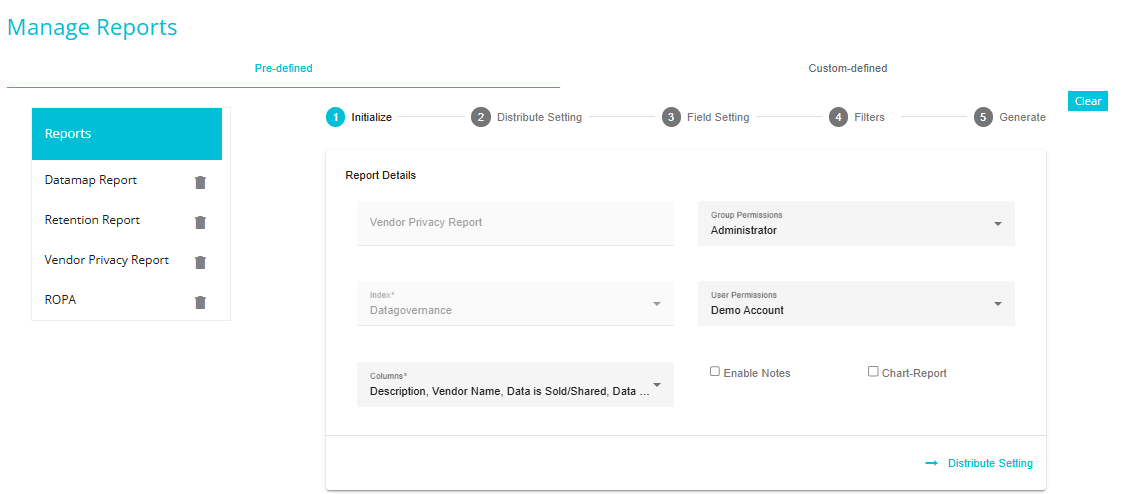
Enable Notes - This option can be enabled if you want to add notes to a report after generating it. A new column will appear on the reports grid when this option is enabled.
Chart-Report - enabling this option generates the reports in charts view, instead of the grids view.
Distribute Setting
This screen provides options for distributing reports through email.
Check the box next to 'Enable Distribution' to distribute the report via email.
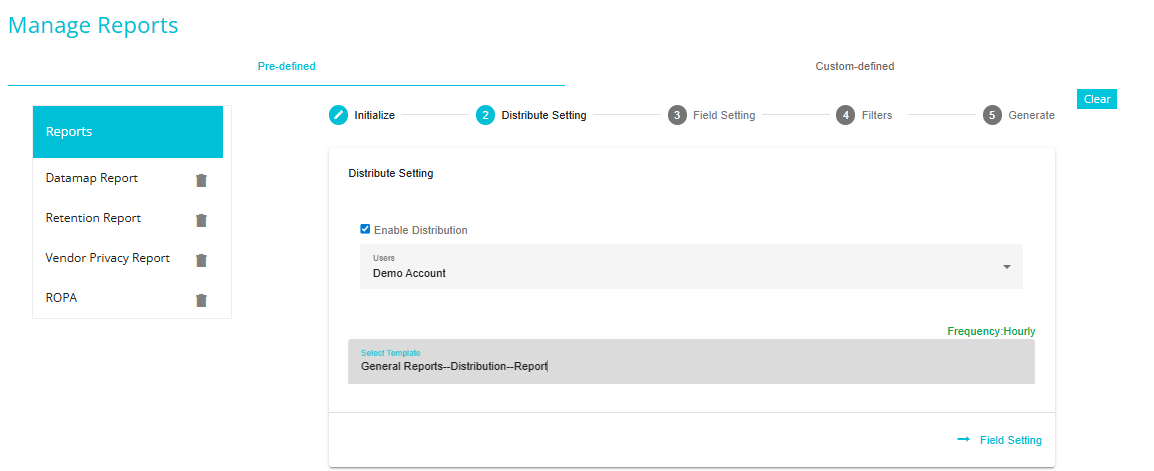
Users - select the users from the list for sharing the report. The field supports multiple selections.
Select Template - The templates determine the distribution frequencies (Hourly or Monthly) of the report. The frequency should be chosen based on the number of times the report has to be distributed via email.
Field Setting
This section allows the sorting of columns and changes the sequence in the report.
Column Sorting - provides the option to choose the order (ascending or descending) of a particular column in the report.
Click on the "+" symbol.
Choose the Column from the 'Column' dropdown.
Choose the 'Order' of sorting (ascending/ descending).
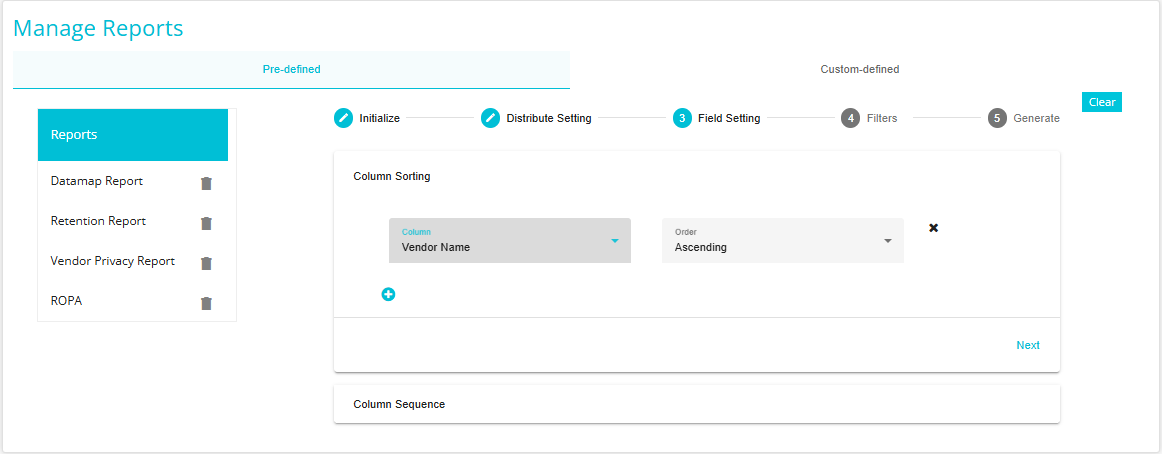
Any additional columns can be added by clicking the "+" symbol.
Delete any column by clicking the "X" symbol beside that column.
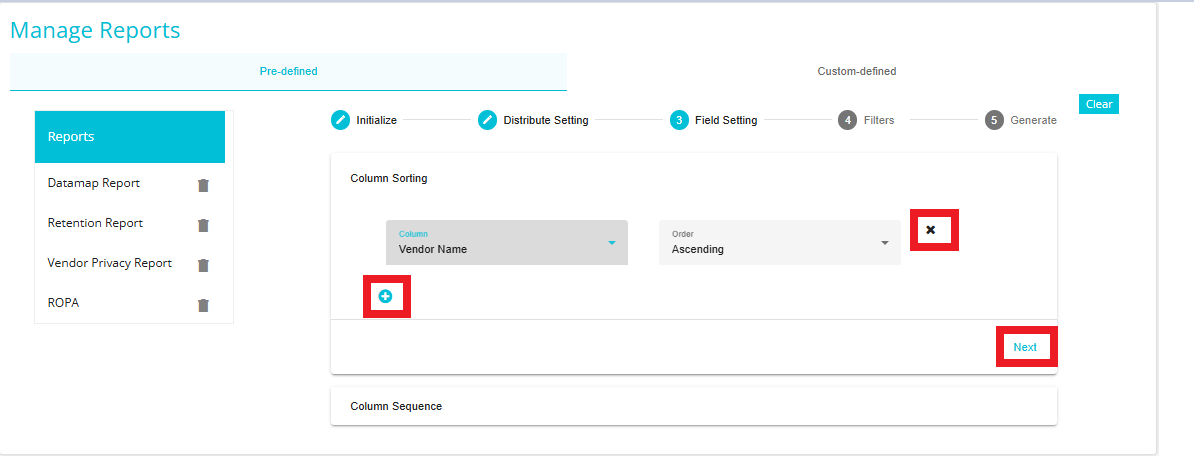
Click Next to go to Column Sequence.
Column Sequence - provides the option to sort the columns in the report. Here, you can see the columns that are visible in the report and choose to hide any columns.
Hide a column by clicking and dragging it to the Hidden Columns side.
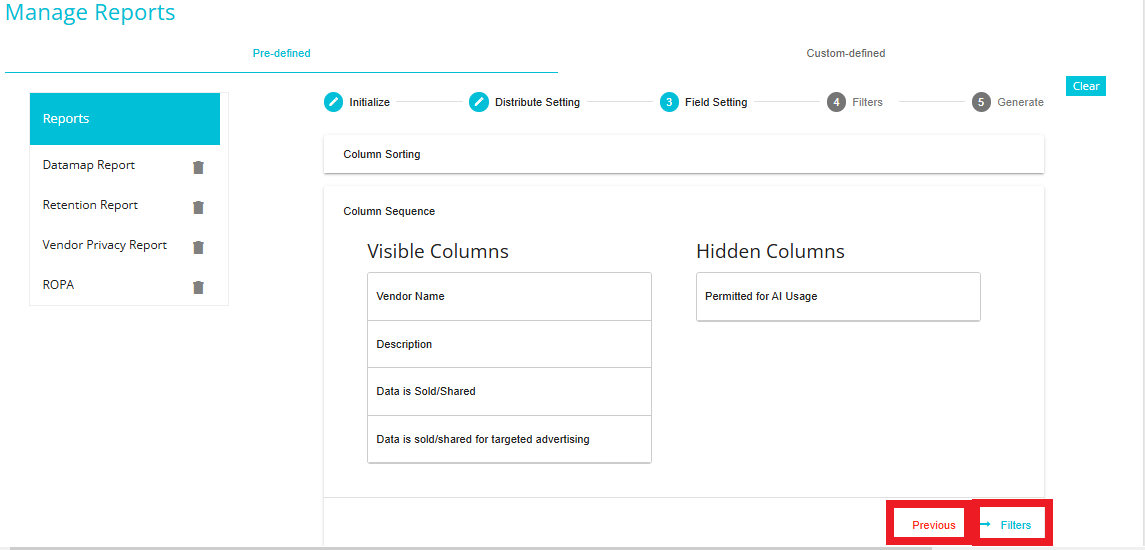
Click Previous to go back to Column Sorting.
Click 'Filters' to go to the next section.
Filters
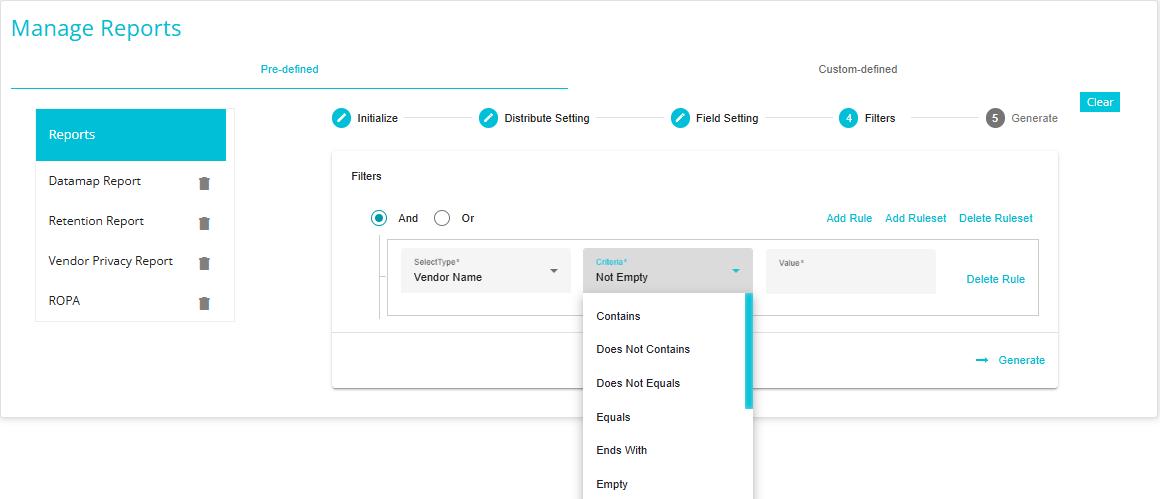
This section allows you to add condition(s) for filtering reports.
Choose from the 'AND' or 'OR' ruleset.
Select any Column on which you want to apply the filter
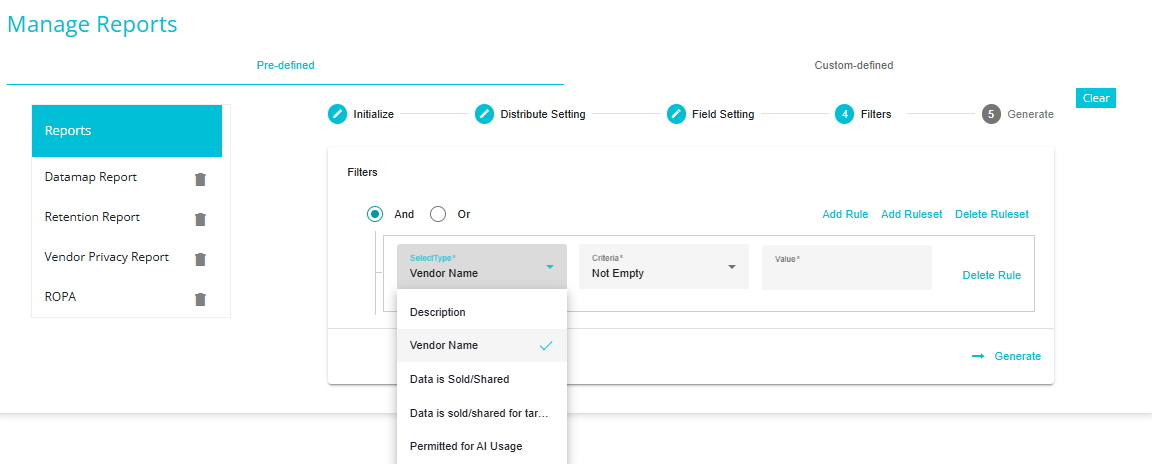
- Select the Filter Operation you want to Perform.
Add Rule - The Add Rule option can be used to add a new rule for filtering.
Add Ruleset - This option can be used to create a new ruleset within a rule for additional filtering.
Delete Ruleset - This option can be used to delete an existing ruleset created for additional filtering.
Delete Rule - This option can be used to delete a rule created for filtering.
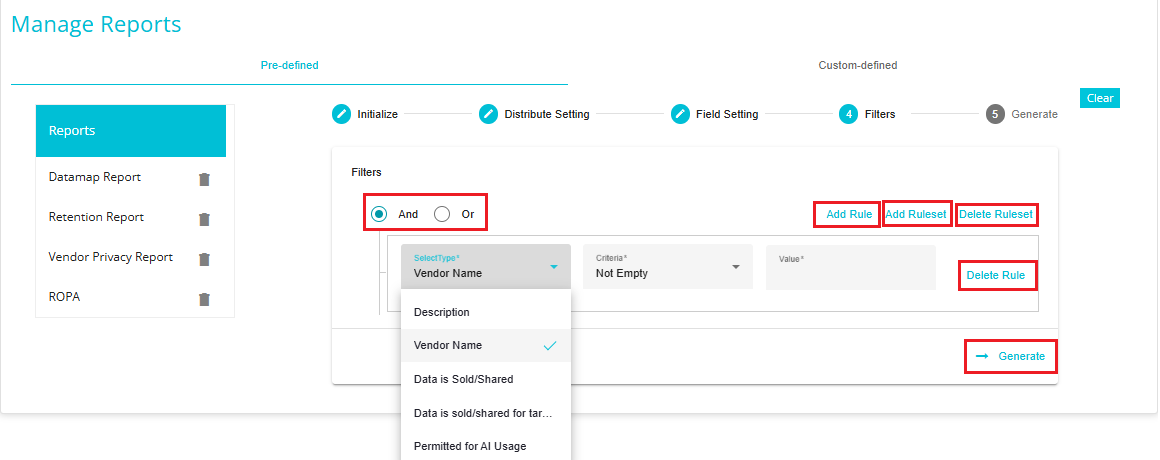
Generate
Here, you will see a summary of the report being generated based on the selections that have been made.
After confirming the summary, click 'Generate Report' for the system to go ahead with generating the report.
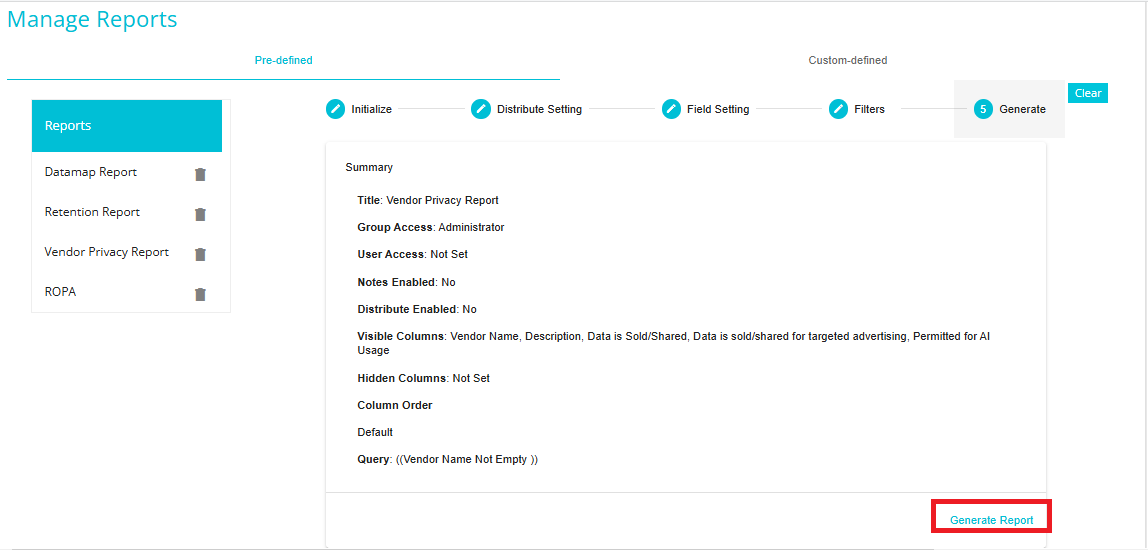
Note: You can go back to any of the four sections to make changes to the selections made. Just click the section name to go directly to the settings for the same.
Viewing the Final Report
Click on the hamburger
icon to open the menu.
Select 'Reports' from the menu.
Select the Report you have created from the dropdown list.
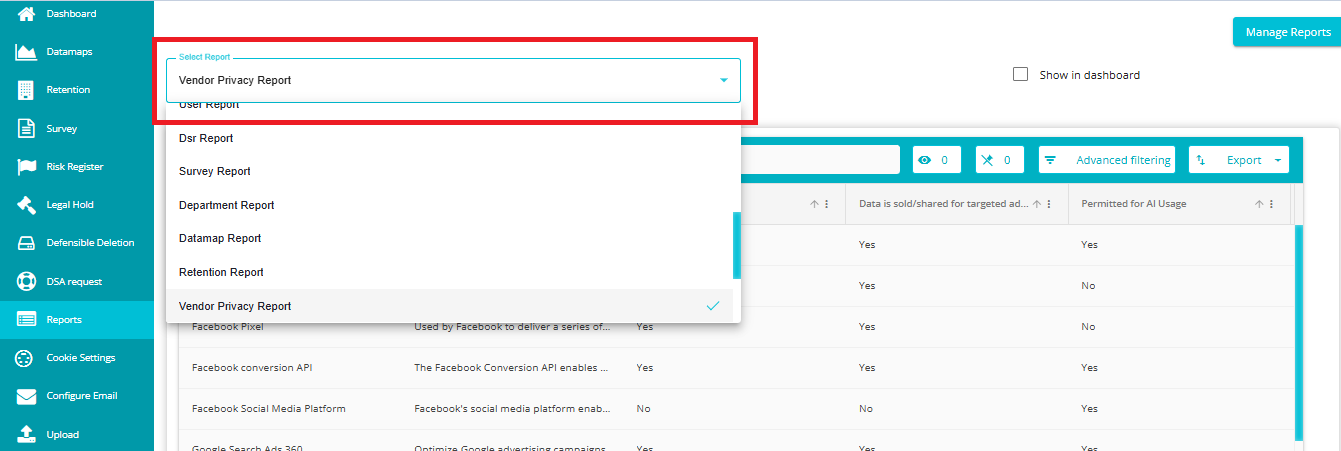
Please follow the steps below to publish the Vendor Privacy Report (Data Governance) as a separate link.
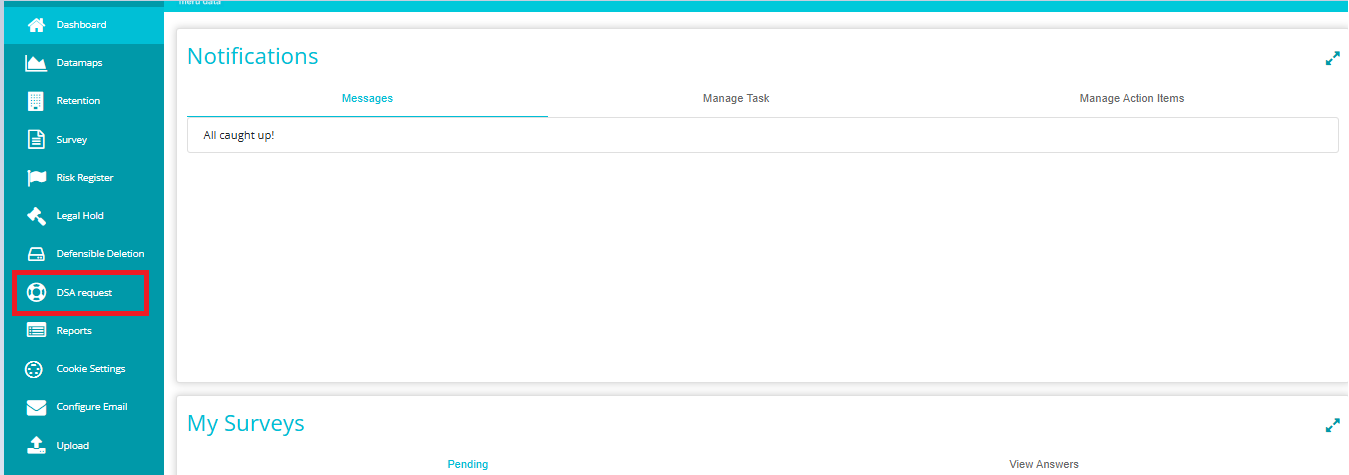
Navigate to the DSA Request module on the hamburger menu.
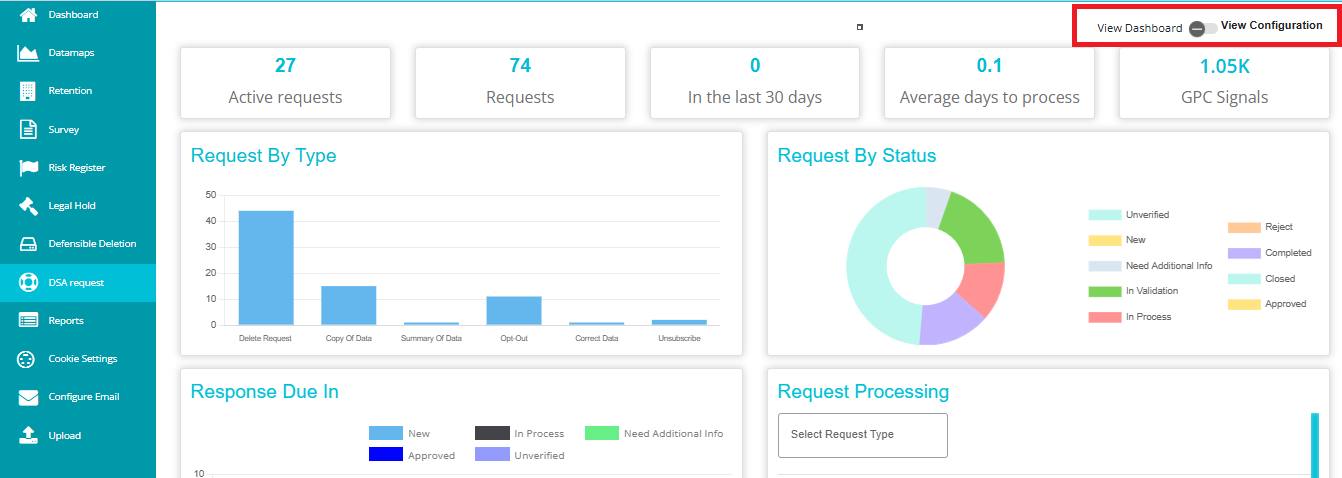
- Toggle the 'View Dashboard' button to 'View Configuration' to see the DSAR configurations.
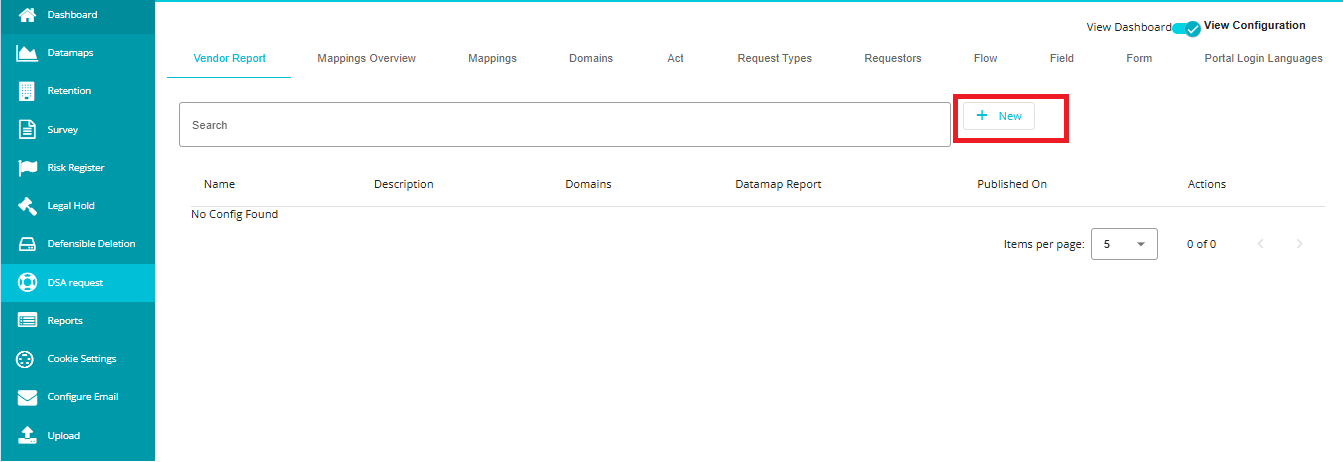
Navigate to the 'Vendor Report' tab on the DSAR Configuration screen.
Click on 'New'.
- Provide a unique 'Name' and 'Description' for the report.
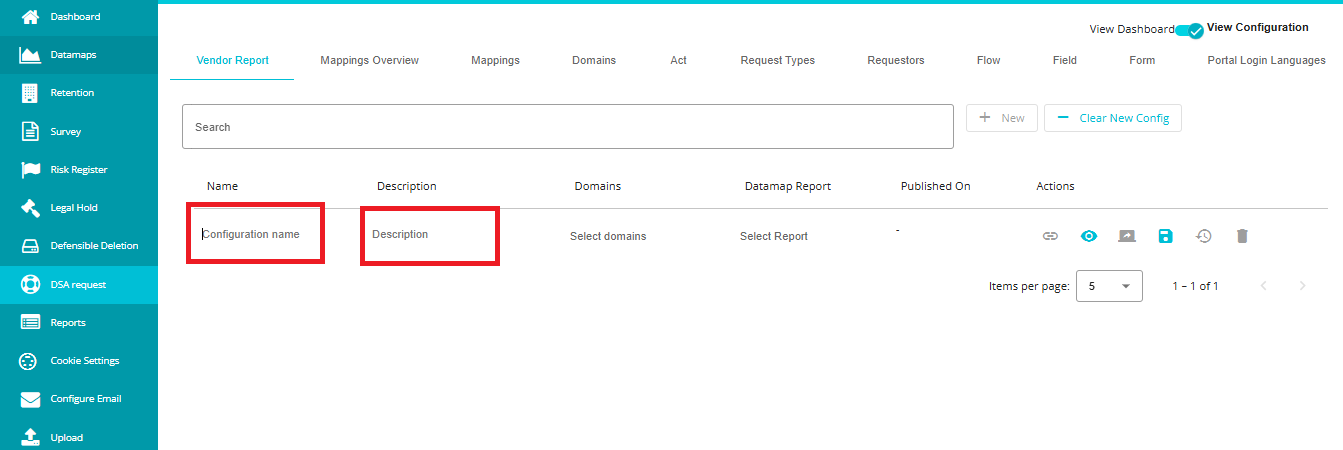
Name -- The name used to uniquely identify the report.
Description -- This is used to provide more information about the report and is also displayed on the published page.
Select a 'Domain'.

Domains -- List of Domains available under a tenant. This is used to map the domains to which the configuration will be applied. Multiple domains can be mapped in one configuration. The same domain cannot be mapped in more than one configuration.
Select a 'DataMap Report' to map.

DataMap Report -- List of reports available under the tenant created in Predefined reports under Manage Reports with the index Data governance. This is used to map a report to the configuration.
- Click on the 'Save' icon to save the configuration.

- Click on the 'Publish' icon to publish the configuration. The published date will be generated automatically after the configuration is published.

- Click on the 'View' icon to view the latest report before publishing.

- Click on the 'Copy Links' icon to copy the published report links. Values will be comma (,) separated if there are more than one domain mapped in configuration.

- Click on the 'Delete' icon to Delete the configuration and published report.

- When you click the Publish History icon, you are taken to the Publish History screen. This screen provides a detailed view of all previously published versions of the Vendor Report configuration.

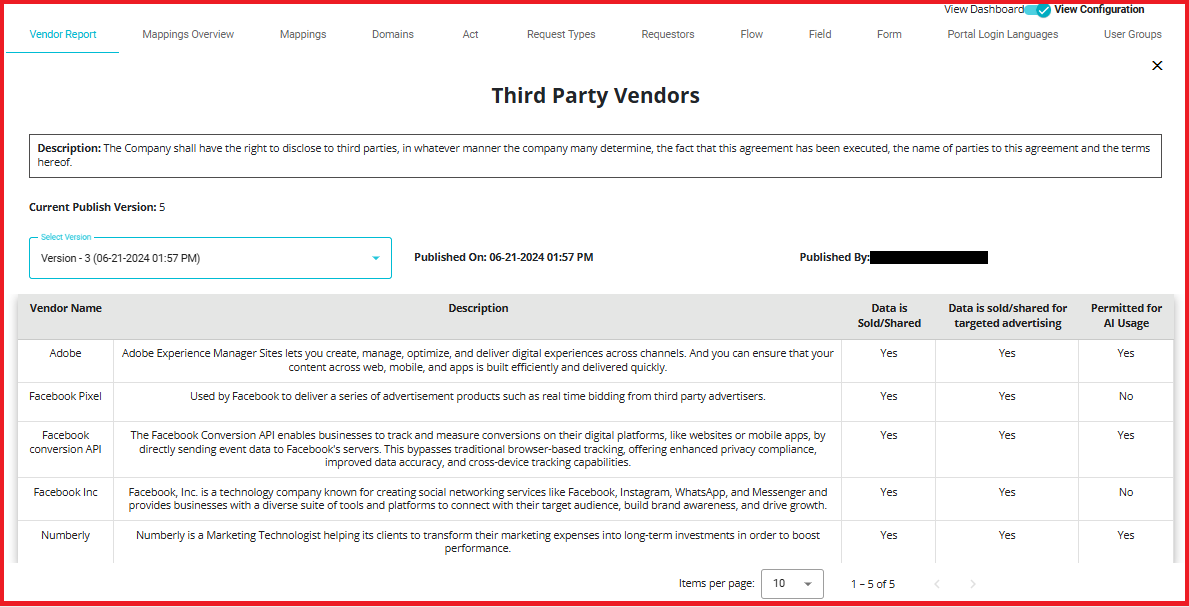
1. Description
- It explains the purpose or context of the report.
2. Current Publish Version
- Shows the latest version number of the published report.
Example: "Current Publish Version: 5" indicates that five versions have been published so far.
3. Version Dropdown
Allows you to select and view any previous version of the report.
Each version is labeled with its number and timestamp.
Example: "Version - 3 (06-21-2024 01:57 PM)" means this was the third published version created on June 21, 2024.
4. Published Date
- Displays the exact date and time when the selected version was published.
Example: "Published On: 06-21-2024 01:57 PM."
5. Published By
- Indicates the user who published that version.
6. Data Table for Selected Version
This table shows the actual data included in the selected version of the report. Each row represents a vendor, and columns provide specific details:
Vendor Name: Name of the third-party vendor (e.g., Adobe, Facebook Pixel).
Description: Brief explanation of the vendor's services or role.
Data is Sold/Shared: Indicates if the vendor sells or shares data (Yes/No).
Data is sold/shared for targeted advertising: Specifies if data is used for targeted ads (Yes/No).
Permitted for AI Usage: States if the vendor's data can be used for AI-related purposes (Yes/No).
To view the published report, take the copied link and paste it in browser.
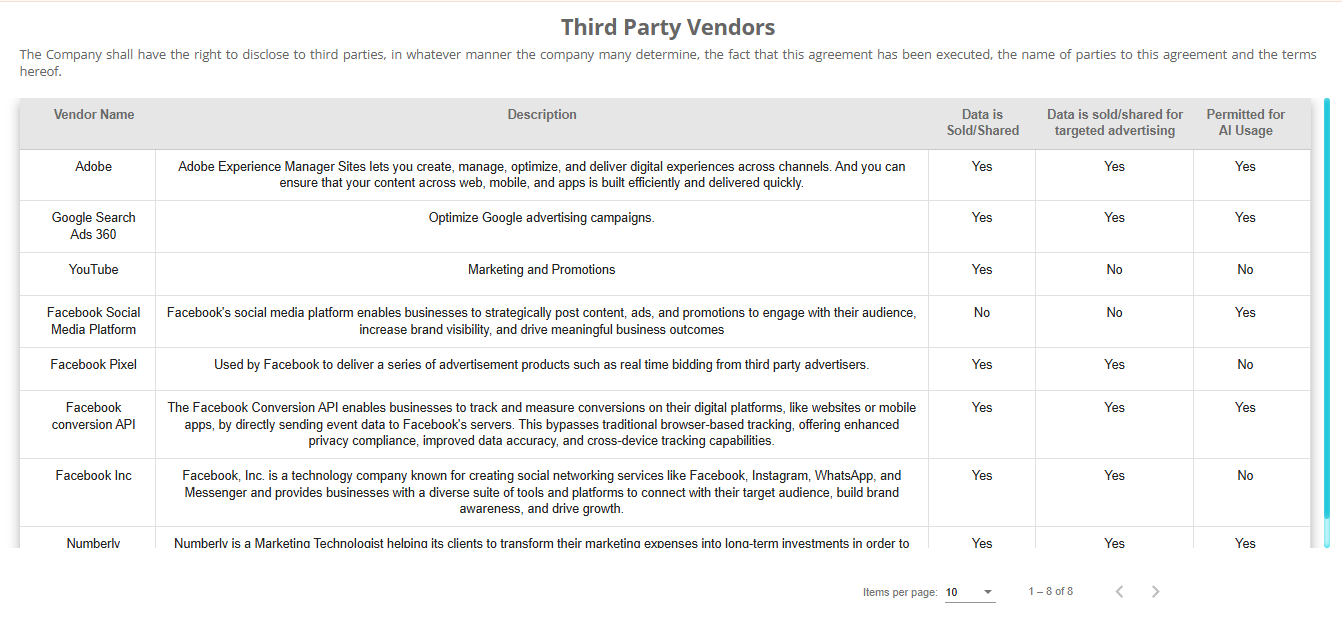
Notes
New changes in the Data Governance report are not automatically updated in the published report. The report should be published whenever a change is needed.
In DSR Emails, [VendorReportLink] placeholder is available. This will be replaced with the published report link.
Steps to Update and Republish the Vendor Report:
Go to "Manage Report"
Select the relevant "Data Governance report"
Make the necessary changes to the report.
Navigate to the DSR section.
Enable the "View Configuration" toggle.
Go to the "Vendor Report" tab.
Select the updated report.
Click "Republish" to apply for the changes.